5 DE Gene analysis
Using limma-voom to screen DE genes based on Read-count expression data and performing GO/KEGG enrichment analysis for differentially Expressed (DE) genes.
5.1 Overview the structure of module page
Every functional module has the same structures including one or several forms for parameter customization. Some common explanations for these forms are listed below:
- Module descriptions are listed above.
- A demo button is supplied for quick filling in all required parameters. One just needs to click the
Submitbutton to get the results or move to the next steps. - Each parameter has an
isymbol to show the explanations of related parameters. - Not all parameters are required.
Note
- Parameters with a red star (*) before are mandatory parameters.
- Parameters without a red star (*) before are optional parameters. For optional parameters, if left unselected, all options are default selected.
- In the case of the chosen of un-existed parameter combinations, drop-down values of each parameter depend on the selection of its upstream parameters. And also, changing the selection of one parameter would clear up any selected values of downstream parameters.

Figure 5.1: A screenshot of the form structure.
5.2 First step: choose options for each required parameter
Just select each parameter sequentially as labeled in the figure.
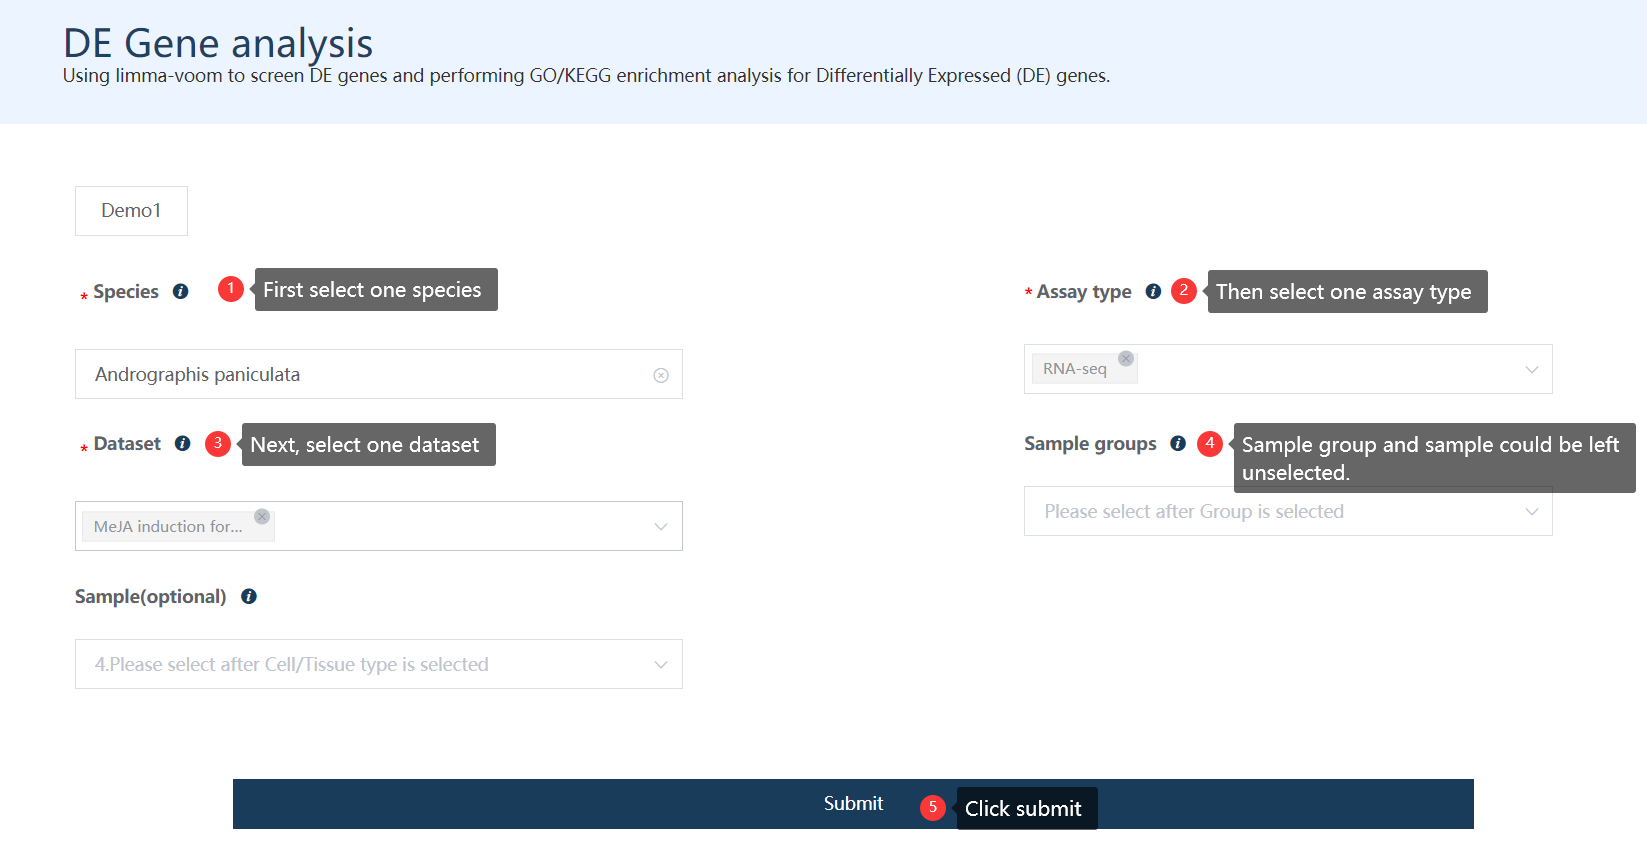
Figure 5.2: A screenshot of the first step of DE gene analysis.
5.3 Second step: check sample correlation profile and filter outlier samples
When samples are selected, the module first integrates the raw expression value of all samples to form the read-count matrix. Then the size factor is estimated like in the R package DESeq2 to generate a normalized expression matrix.
5.3.1 Automatical or manual detection of outlier samples
Samples passed the outlier sample detection are defined as normal samples. All samples in the Sample passed filter box would be treated as normal samples (corresponding to outlier samples) and will be used for downstream analysis. The checkboxes were used for sample transfer only.
Definition of outlier samples
Outlier samples were defined as those that have abnormal low overall similarity with all other samples. For one sample A, the overall similarity with all other samples is defined as K which equals the sum of the person correlation value of A with all other samples. Then the K for all samples was scale-transformed. The ones with scale-transformed K less than -4 were defined as outlier samples.
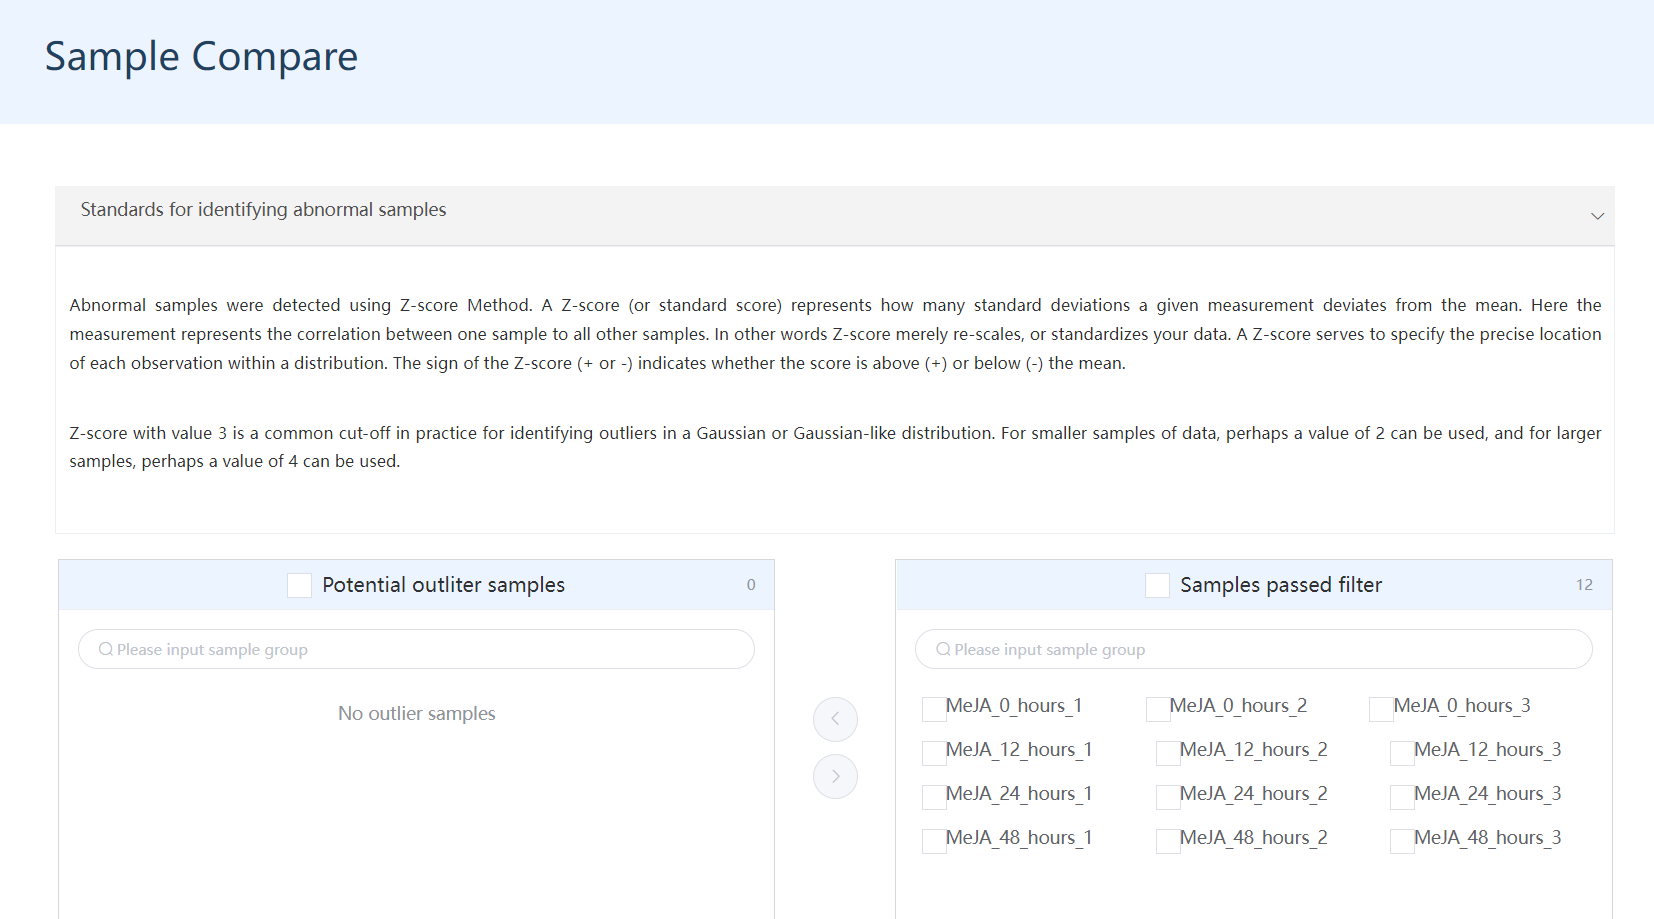
Figure 5.3: A screenshot of outlier sample detection.
Also, users are allowed to select any sample as an outlier sample based on the sample correlation heatmap and PCA plots below and manually transfer these samples to the Pontential outlier samples box.
Outlier sample detection principle
Abnormal samples were detected using Z-score Method. A Z-score (or standard score) represents how many standard deviations a given measurement deviates from the mean. Here the measurement represents the correlation between one sample to all other samples. In other words, Z-score merely re-scales, or standardizes your data. A Z-score serves to specify the precise location of each observation within a distribution. The sign of the Z-score (+ or -) indicates whether the score is above (+) or below (-) the mean.
Z-score with value 3 is a common cut-off in practice for identifying outliers in a Gaussian or Gaussian-like distribution. For smaller samples of data, perhaps a value of 2 can be used, and for larger samples, perhaps a value of 4 can be used.
5.3.2 Interactive heatmap showing sample correlation profiles
The sample correlation heatmap and PCA analysis were performed and the results listed below.

Figure 5.4: Heatmap showing expression profile of 12 samples. DE_Group: Biological groups detected based on metadata and user selection. Single_group: check if one biological group only contains one sample. Single_batch: check if one specified batch only contains one sample. Outlier: Potential outlier samples when this value is true. Suggest_remove: Samples with this value as true would be automatically removed.
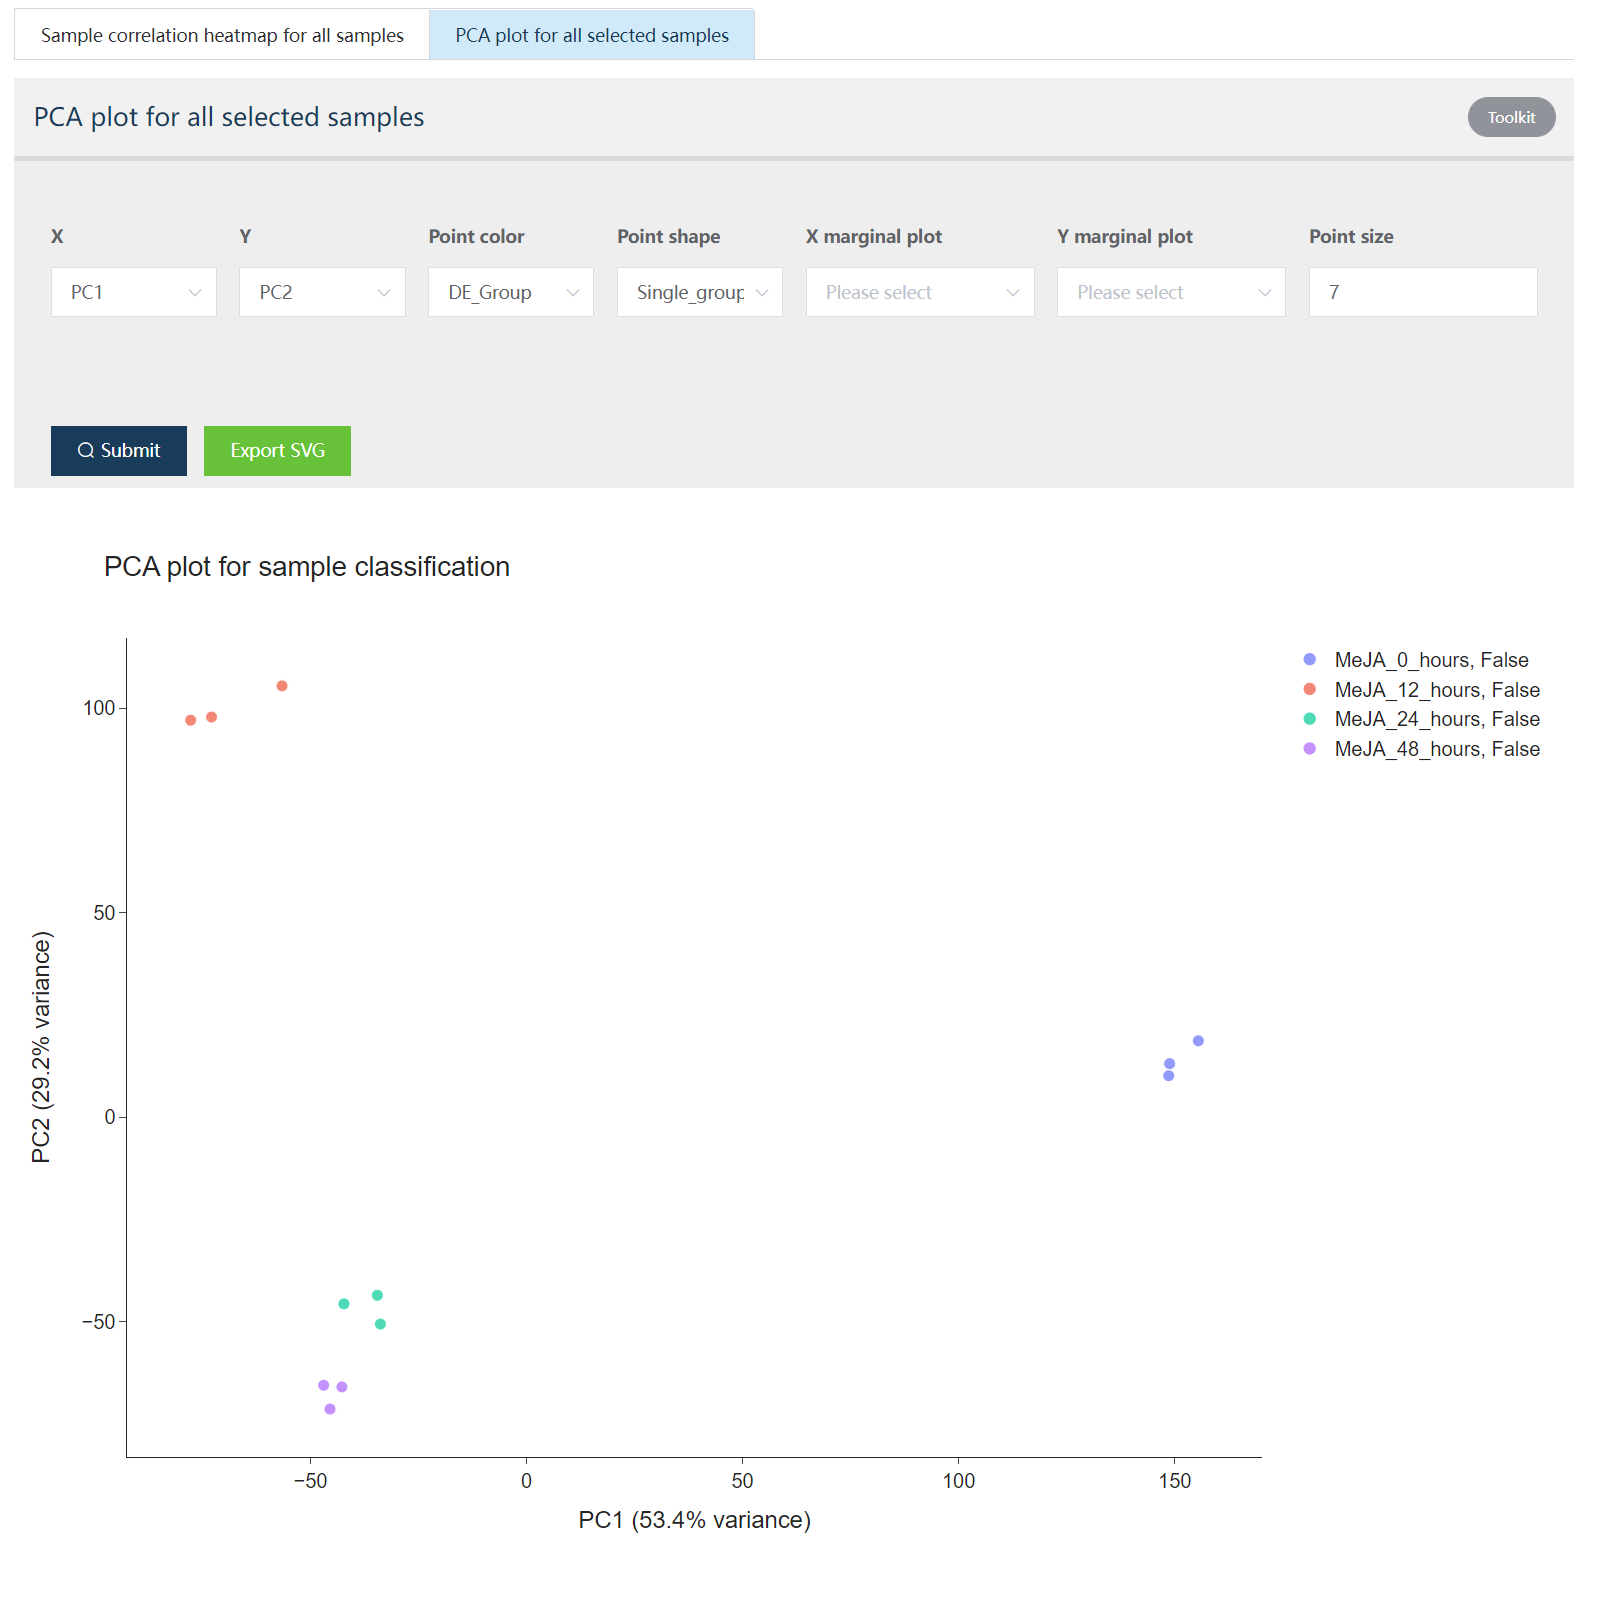
Figure 5.5: The principle component analysis (PCA) shows sample distributions in PC1 and PC2 space. In the Toolkit part, users could select to change PC1-PC2 space to other principle components constructed space. Also, point color, point shape, and point size could be mapped by different sample attributes for data exploration. X/Y marginal plot could generate sample distribution along PCxx axis.
Note
Some plots have a
Toolkitbutton at its right-topp corner.
Export SVGcould export the plot in SVG format for further processing on the local computer.- Other parameters to change picture attributes or picture contents.
5.4 Third step: Set compare groups
For this example, we want to check the expression differences along inducing. We may first compare each induced stage (MeJA_12_hours, MeJA_24_hours, and MeJA_48_hours) with the initial stage (MeJA_0_hours).
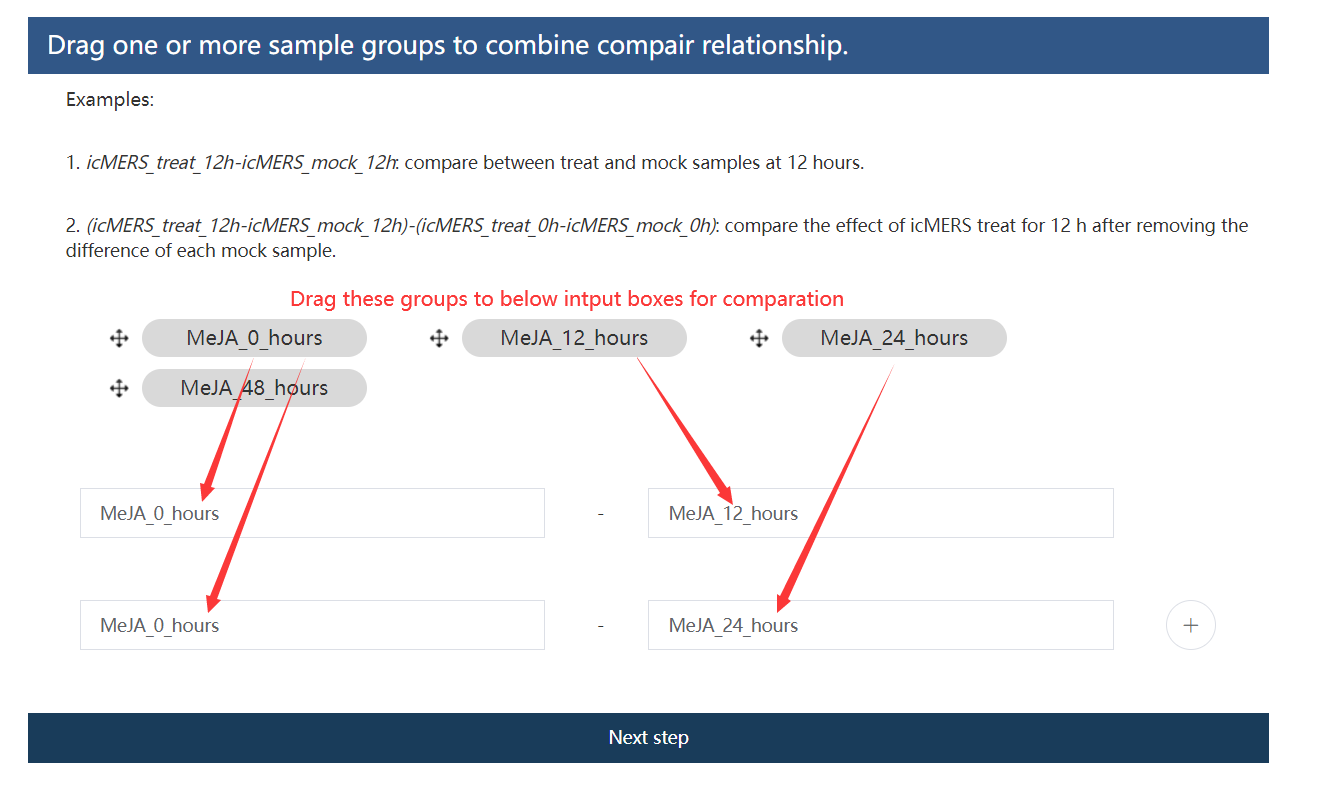
Figure 5.6: Set compare groups.
Note
Simple and complex comparation relationships could be constructed.
icMERS_treat_12h-icMERS_mock_12h: compare between treat and mock samples at 12 hours.(icMERS_treat_12h-icMERS_mock_12h)-(icMERS_treat_0h-icMERS_mock_0h): compare the effect of icMERS treat for 12 h after removing the difference of each mock sample.
5.5 Forth step: Set filtering thresholds for DE genes screening
Genes with detected FDR values less than the user-specified values and absolute log2 transformed expression fold change no less than the given value would be treated as DE genes.
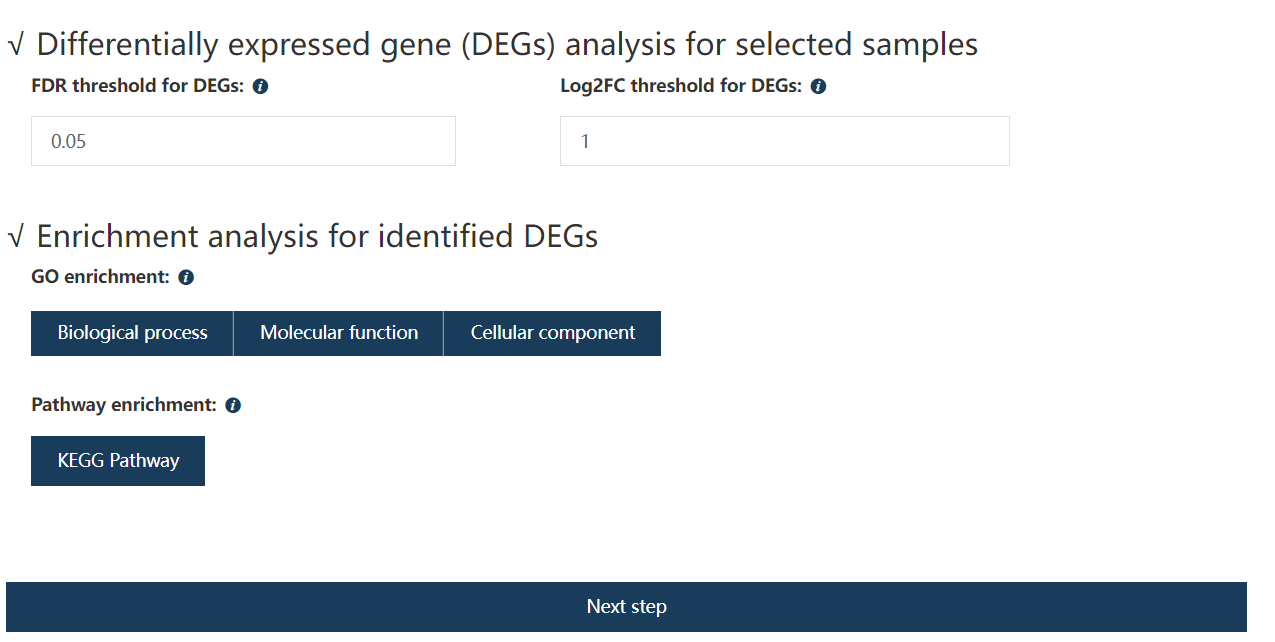
Figure 5.7: Set the FDR and absolute Log2FC for screening DE genes.
5.6 Fifth step: an overview of samples information and analysis parameter information
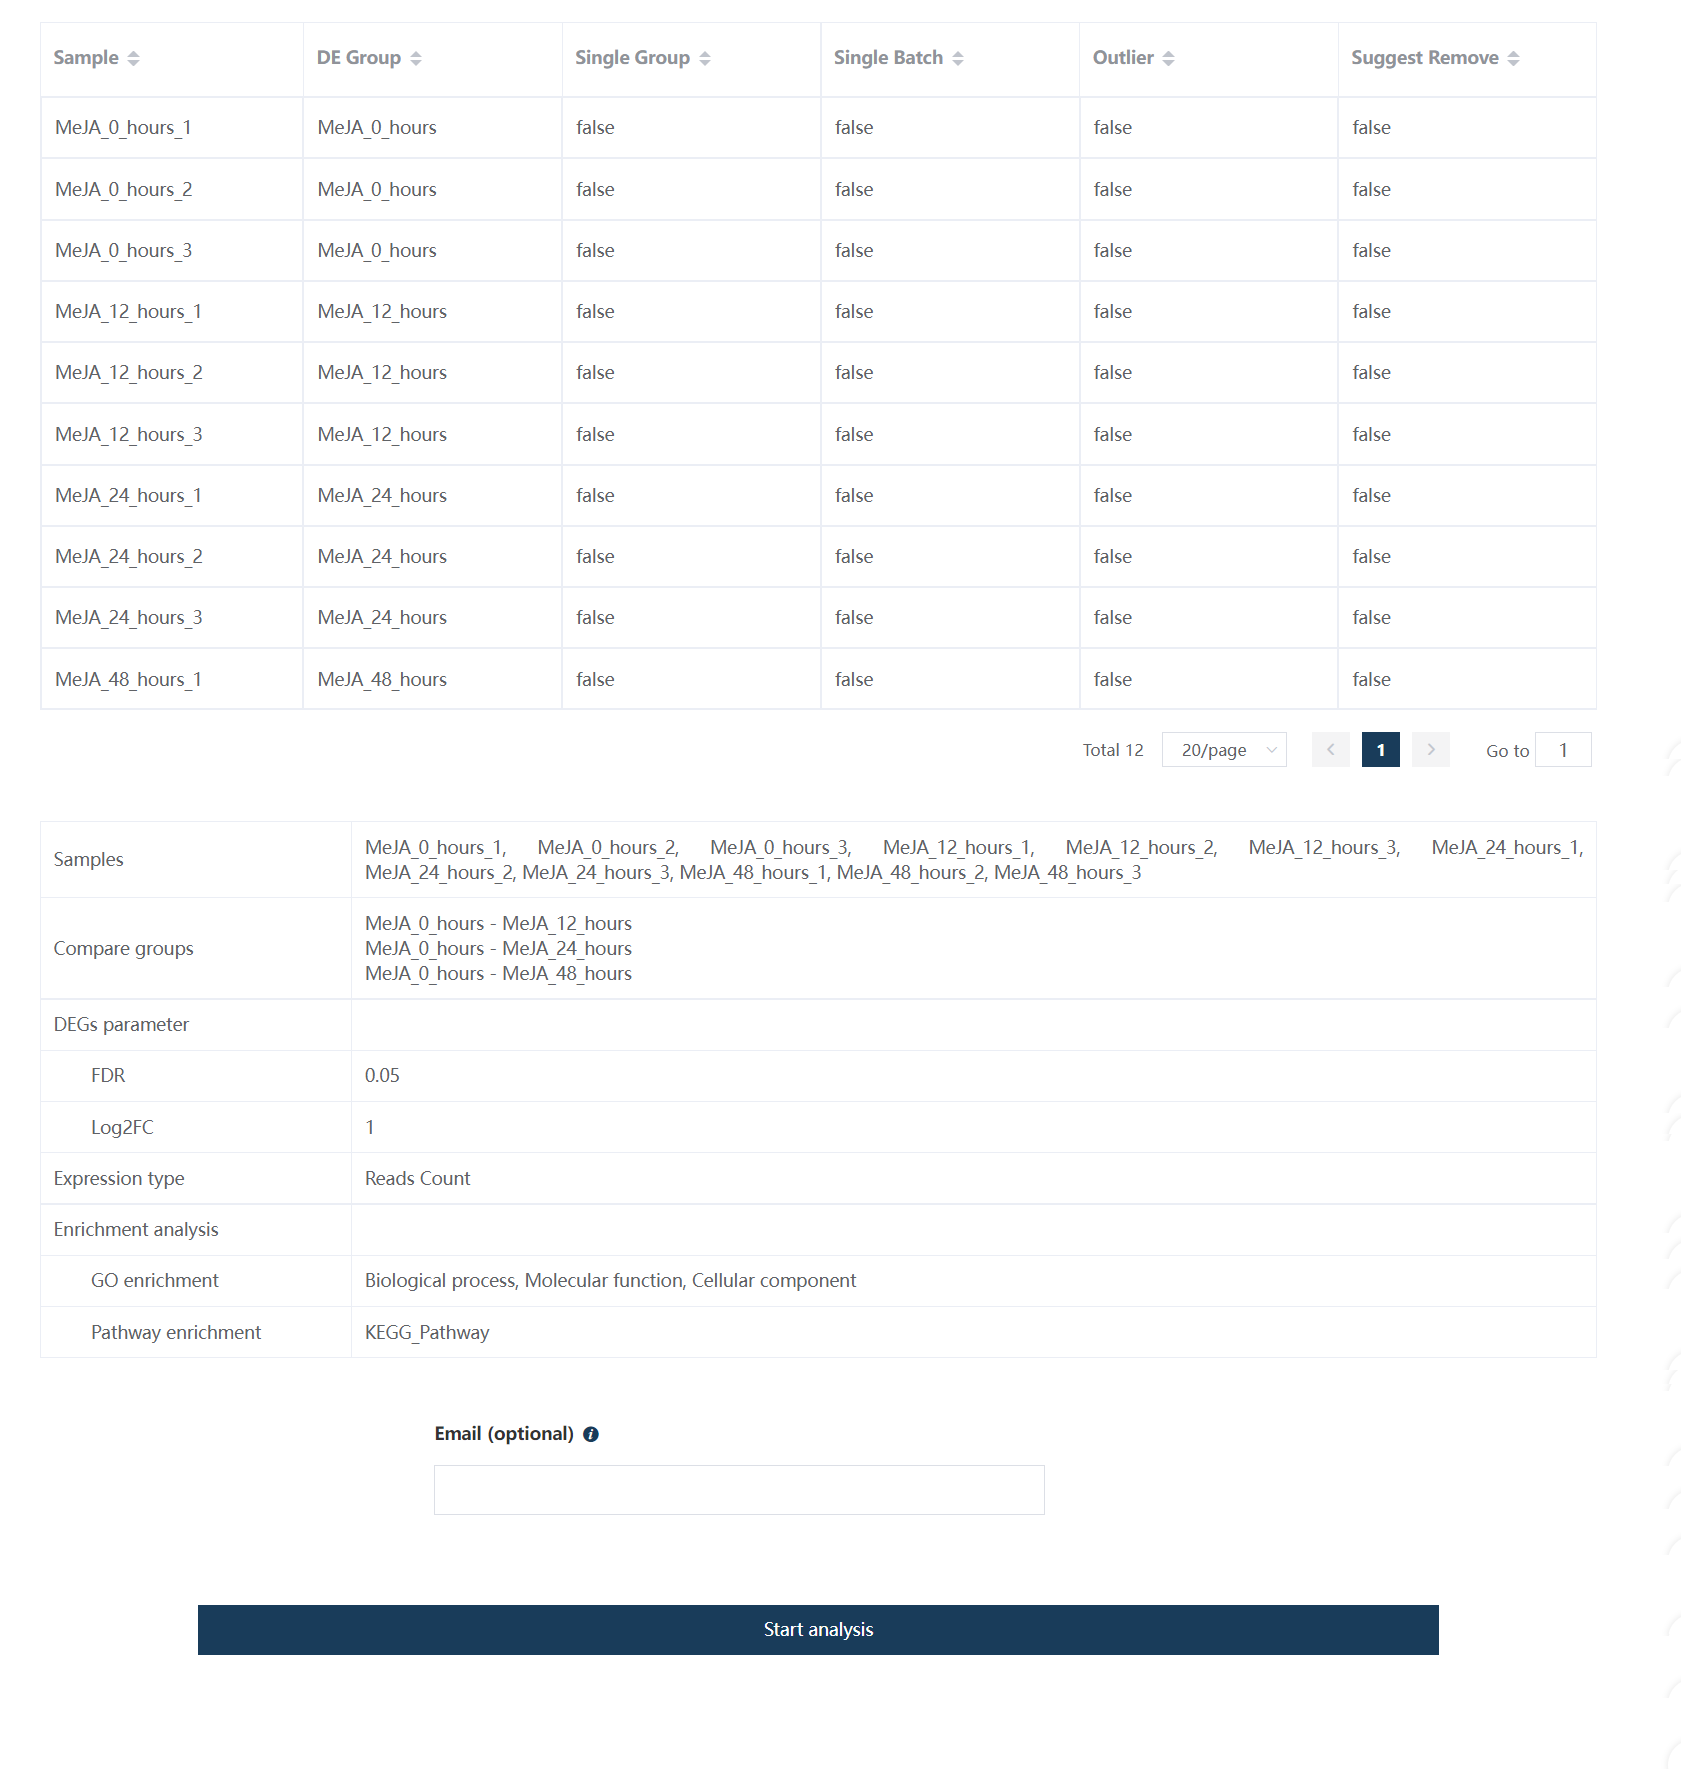
Figure 5.8: Overview of the sample information and parameter information.
Note
An email address is optional but not required for receiving the results. After clicking ‘Start analysis’, the web page would be re-directed to the result page, in which the result link would be put into the web pocket for later access. If the email address is given, the result link would also be sent to a given address.
5.7 Sixth step: DE Gene analysis results report
A report including sample information, sample correlation visualization, DE genes heatmap, and volcano plot, Functional enrichment results would be shown on the result page.
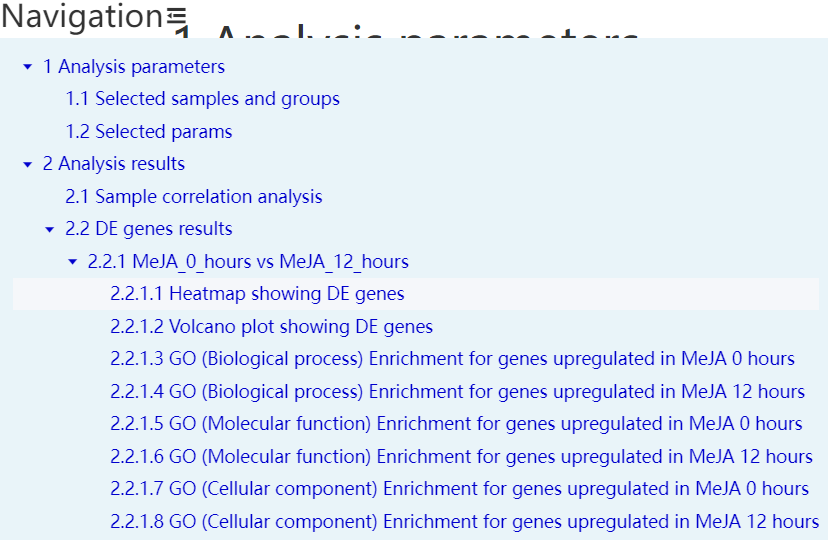
Figure 5.9: Table of content showing the structure of the report and navigating to each resulting part.
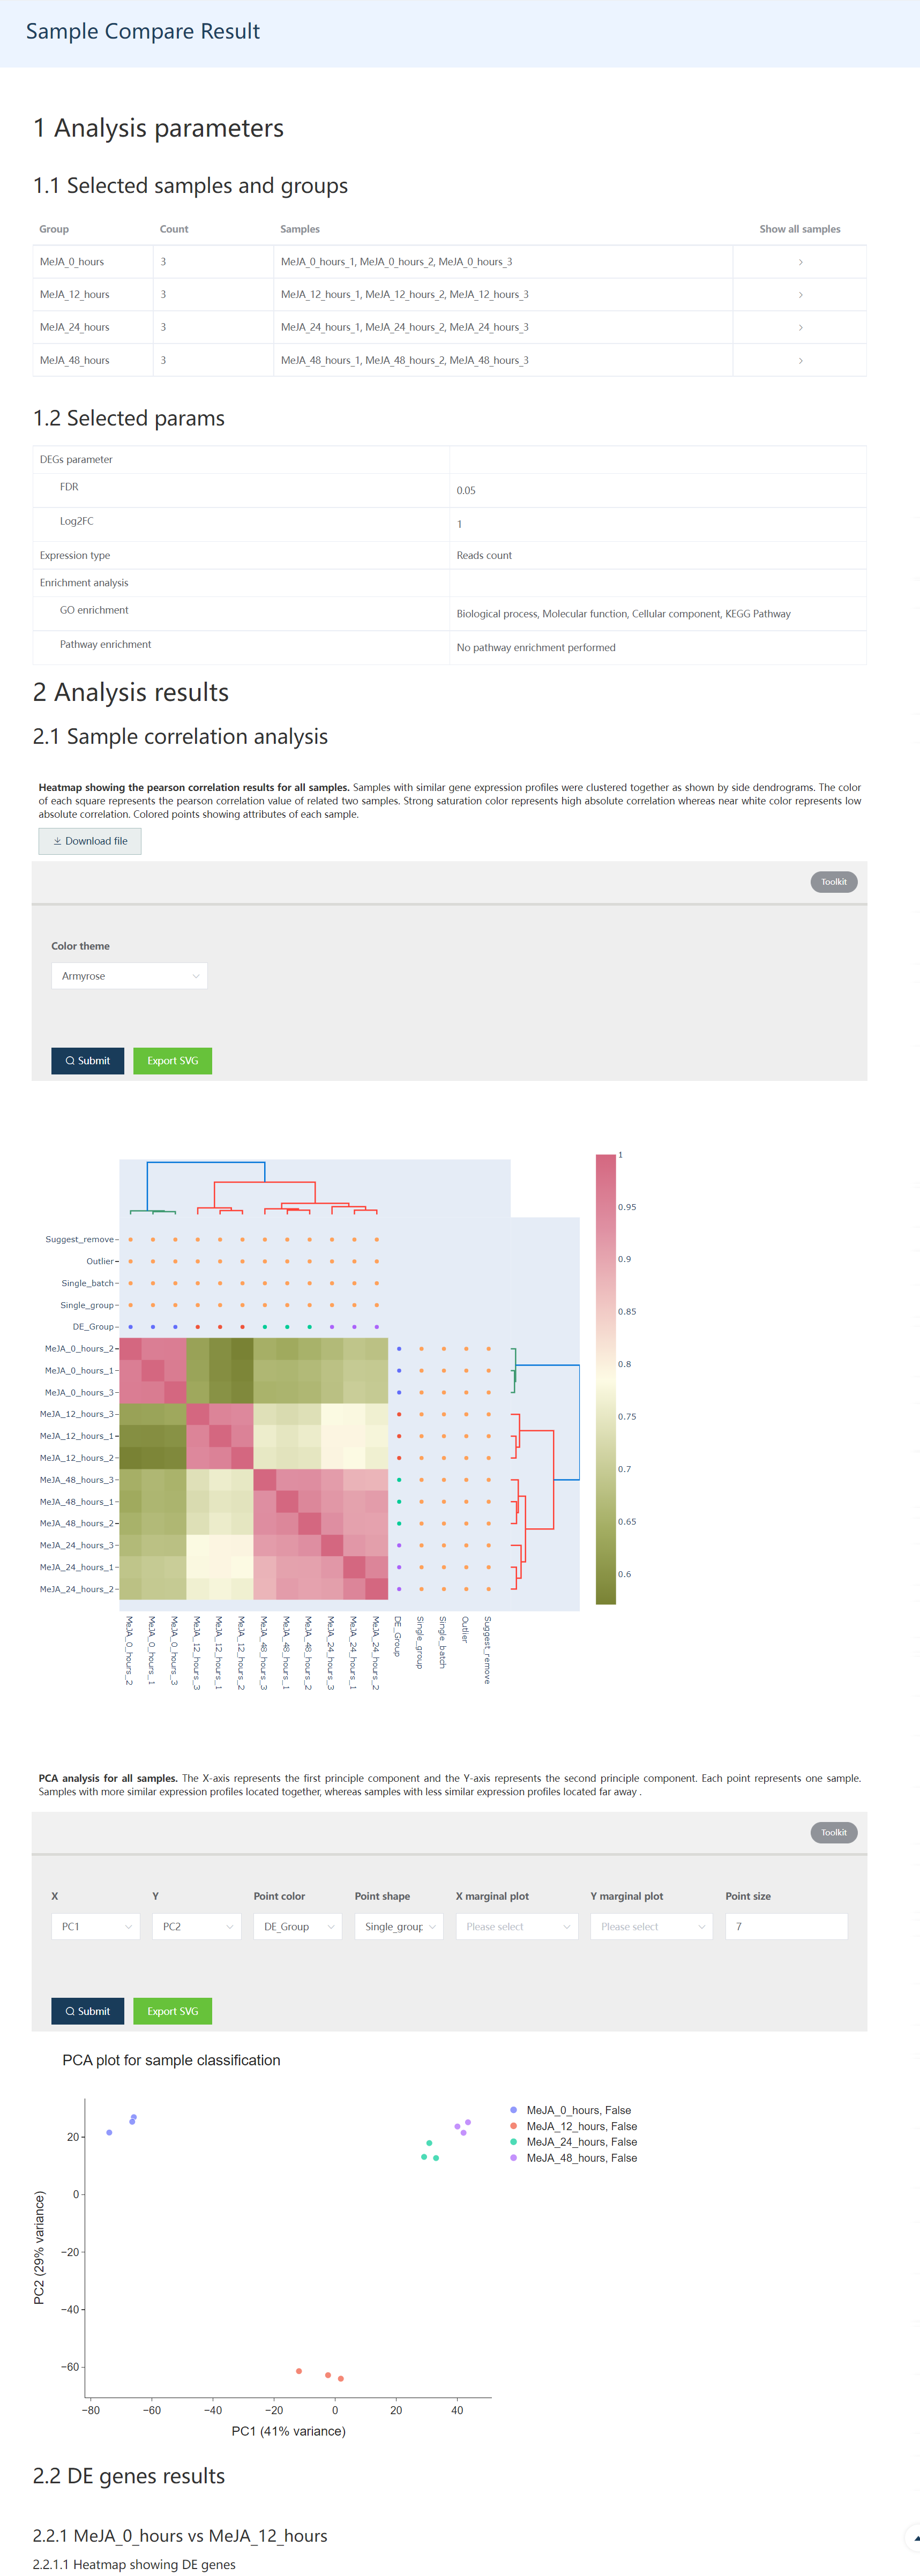
Figure 5.10: The first part of the DE gene result report includes whole sample information, and sample correlation information.
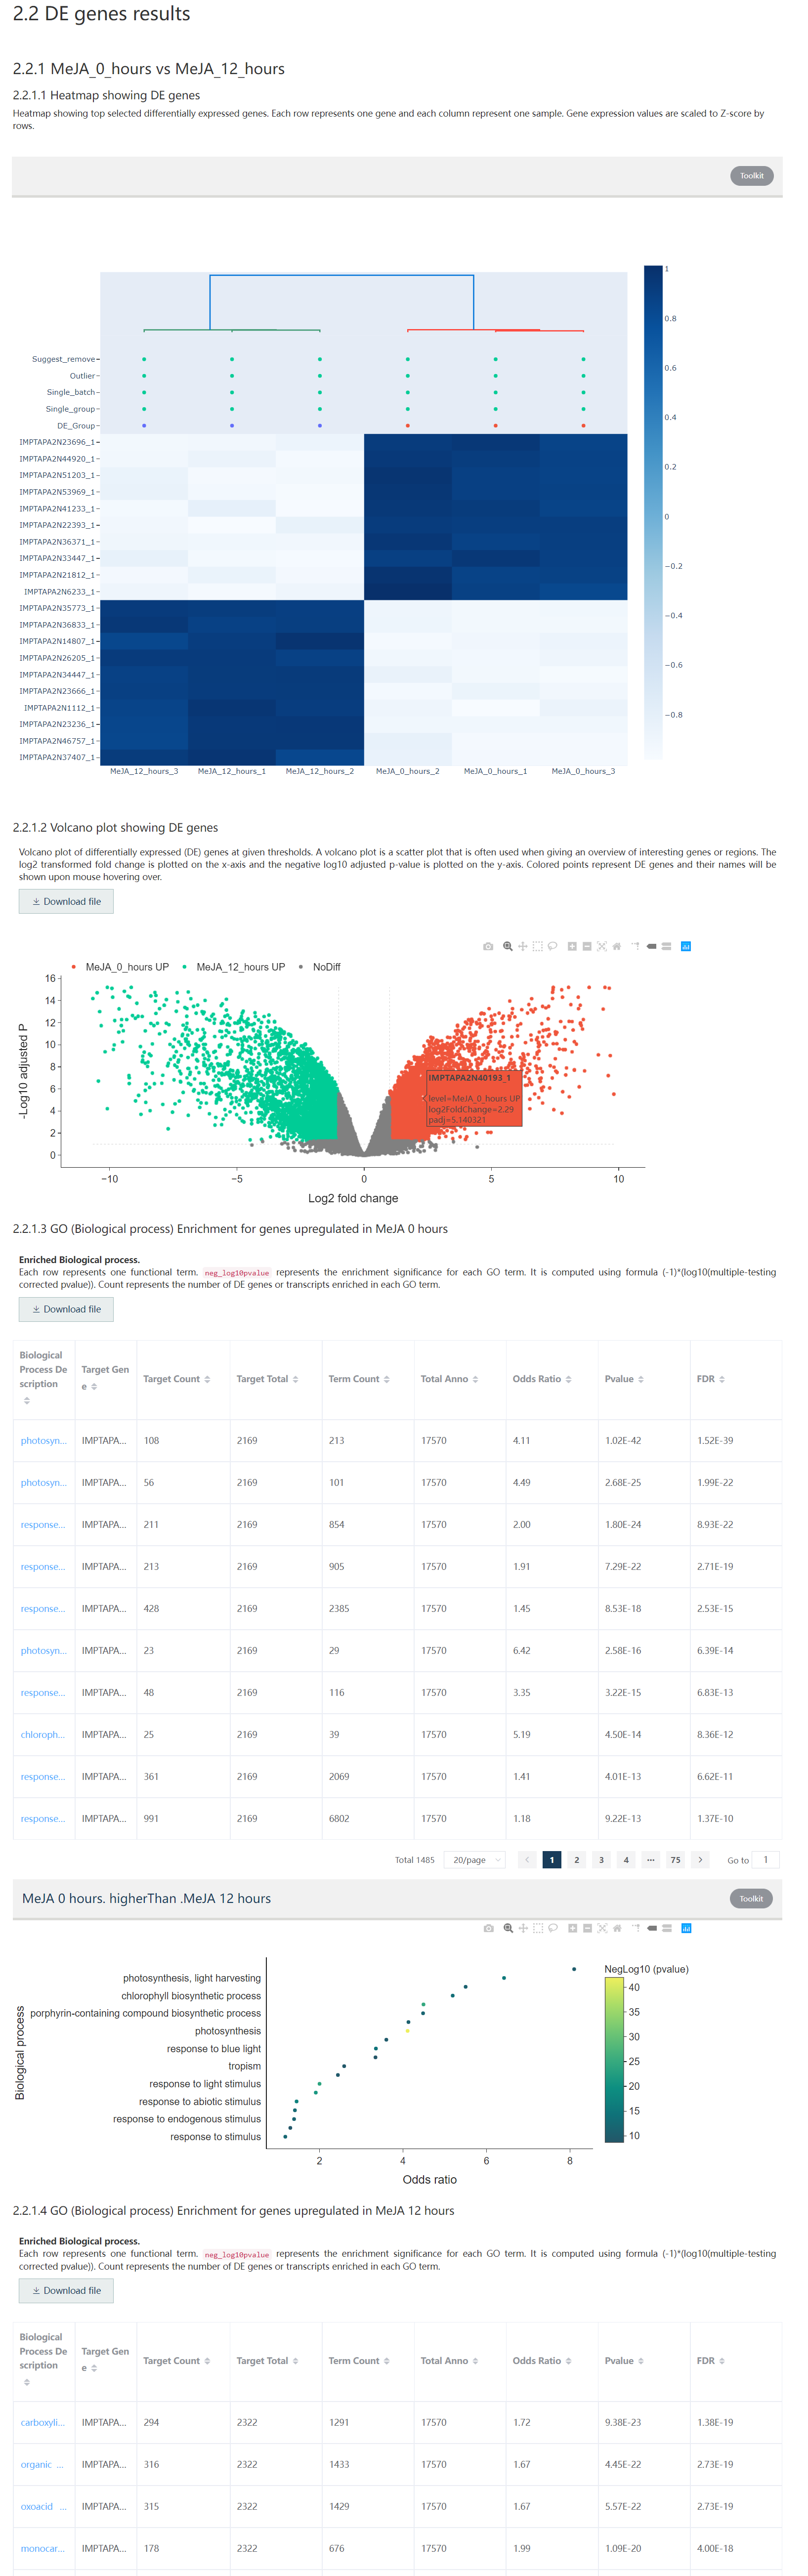
Figure 5.11: The second part of the DE gene result report includes DE gene heatmap, volcano plot, and functional enrichment result.